Diamond Painting Strategies from our customers!
Different Diamond-Paint strategies from our customers
Diamond painting is fantastic; every customer agrees on that! But what is the best way to make a diamond painting? Opinions differ.
Any way is good of course. But still, we encounter a lot of different techniques in our Facebook group. We are happy to explain to you in this blog which what the different techniques are and how to use them, so you can try them out yourselves! Will you let us know what your favourite is?
Whatever strategy you use, there are three things that are indispensable for making a diamond painting: a diamond painting pen to place the stones, a storage box to keep your stones organized and a diamond painting roller, to press the stones well after they have been glued.
Are you a beginner with painting? Read our first blog ‘How do I start with Diamond Painting’ before you focus on the different paint strategies!
Working with a ruler
The adventure will begin when you lay your first stone. Your artwork will come to life, brick by brick. Did you know that when you put the first row of stones against a ruler, the rest of the painting automatically becomes super straight? Sometimes it is a bit difficult to get the first row on the outside of the painting perfectly straight, because you have no other stones to push the next one against. The ruler ensures that the ‘edge’ is slightly raised. You can see that as a row of stones so that you can be sure that you have started tight!

Have your stones not completely straightened out? We recently started selling this super handy stones corrector! With this tool you can press whole rows of stones in one go!
Checkerboard technique
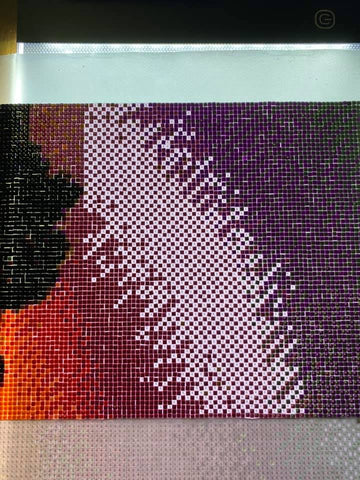
We see that this technique is often used by painters who prefer square stones. This way, you get the stones super tight next to each other. By skipping a square with each stone, you create the so-called checkerboard system. It looks like this:

Painters mainly do this when you encounter large areas of the same colour. This can sometimes get boring so you can quickly lose your concentration. This is the way to make it more fun and the result is fantastic!
At first sight, it looks a bit strange. But in the end it becomes a very tight whole.


Farmer method
This method is meant for the farmers among the painters. Haha, just kidding ;). With this technique, you divide larger parts of your diamond painting into smaller squares. Thereafter, you will ‘harvest’ these smaller parts. It means you will fill them with diamonds so that the squares are no longer empty. This is where the term ‘farming’ comes from, isn’t it funny? This method is suitable for both round and square stones. It is used to make larger pieces of painting of the same colour more manageable by dividing it into smaller squares. You can see how it works below!

Blocks or strips
Have you ever thought about this? You can remove the protective layer on the canvas in one go. But this is only for the ultra-fast painters among us! This is not the intention for the larger formats. It is better to distribute the protective layer. But do you do this in blocks or in strips?
Blocks
If you decided to divide your canvas into blocks, you proceed as follows. You divide the protective layer into sections of 10 by 10 cm. These can be larger or smaller, depends on what you prefer. Then you cut out the cubes and get started! The choice is entirely up to you whether you fill in the blocks per colour or per row. We prefer per colour!

Strips
Do you prefer to work in strips? That is also handy! You divide the canvas from top to bottom. Proceed in same way as for the blocks. Are you left of right handed? This is important to consider whether you start on the left or right. You don’t want your arm to go over the painting.
Do you have another well-functioning Paint strategy? Let us know below! We are very curious!
Keep up to date on our Facebook page with the latest paint strategies!
To try out the newly learned strategies, visit some of our most popular collections:

Comments
Leave a comment